


A ruling pen is a tool that artists and calligraphers use for drawing with fluid media such as ink, gouache, watercolour etc…
It is mainly used for straight lines, but it can also be used for curved lines, as we will see in this post.
In the past, a ruling pen was used for technical drawings in engineering and cartography, but with the advent of technical pens and computer programs, this amazing tool has been left on the side.
PRO AND CONS
Compared to the technical pen, one ruling pen can draw different line widths, while you need many technical pens to achieve the same result. Technical pens also need much attention to prevent the nib from clogging, and they are not even cheap.
Don’t get me wrong. I love technical pens, but a ruling pen is even better.
Compared to the computer, well, it’s hard to tell. Computers have improved our lives, but the fulfilment of doing something with your own hands is hard to beat.
On the other hand, ruling pens need some caring, too, as it is better to clean them after every use. Nowadays, it is hard to find a good-quality ruling pen. New ones are mostly poor quality, and vintage ones are chipped, worn out or rusted. The tip needs to be sharp and thin, as we will see later.
The most important brands in this case are Haff, Rotring, Kern or Keuffel & Esser.
Learn more about the importance of a good-quality ruling pen here: The most expensive lesson I’ve learnt as an Islamic geometry artist.
TYPES OF RULING PEN
It is unbelievable how much information you can find on these old tools with a proper Google search.
As you can imagine, there are different types of ruling pens depending on the use and thickness of the line. The following list might not be exhaustive, but it gives a nice overview of the main types.
I will try to give examples for each one.
Common ruling pen
This is the common one we are all familiar with.
The maximum line thickness this pen can achieve is usually under 0.75mm, while the minimum can be as thin as a hair. It is usually used against the inking edge of a ruler and kept perpendicular to the paper.
Find more visual info about this tool here.
Curve pen
This is a ruling pen with a curved nib (as the name suggests), and it’s usually used for curves (using a French curve) or freehand drawing, although it works with a straight edge, too.
At the end of the handle, you can find something like a knob that serves to adjust the looseness of the nib from swivelling to fixed.
Find more visual info about this tool here.
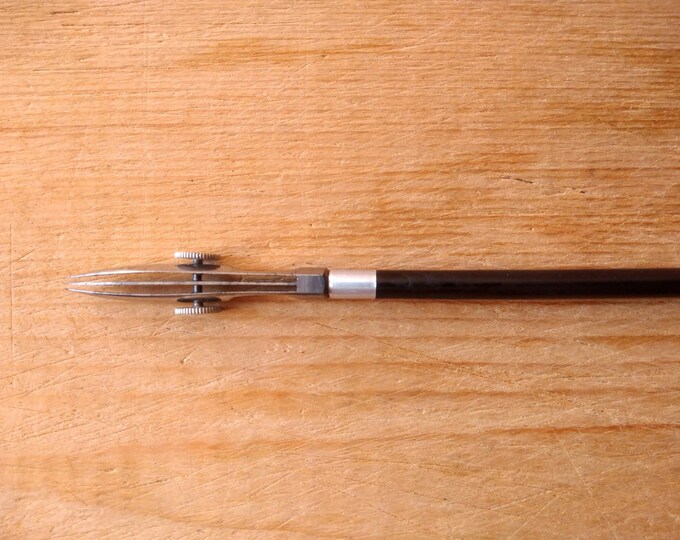
Railroad pen
This ruling pen has two pairs of curved spring blades with three adjustment nuts. It is used to draw two parallel lines at the same time. The maximum line thickness is 0.75mm.
Find more visual info about this tool here.
Border pen
This wide-bladed tool is a wider version of the common ruling pen. Although the line thickness doesn’t change much compared to the common ruling pen, it holds more ink so that you can draw longer lines, such as borders, without recharging it as often. This is why it is called a “border” pen.
Find more visual info about this tool here.
Broad pen
Sometimes it is also called 3-bladed pen. This pen is the one you need for thick lines.
As the name suggests, it is made of 3 blades or two back-to-back pens, and you can double the line width of a common ruling pen.
See the picture above for visual reference about this tool.
Compass ruling pen
Also called steel pen, this is an extension you can use on the compass instead of the lead point.
It works just like a common ruling pen with the benefit that you can draw circles with it. The maximum line thickness is around 0.75mm.
Find more visual info about this tool here.
HOW TO USE IT
The basic requirements for the ruling pen to work properly are:
- both nibs touching the paper:
You need to hold the tool vertically to have both nibs touch the paper.
That applies to the compass ruling pen, too. In that case, you will bend the “knees” of the compass to have the legs perpendicular to the paper.
- the nibs need to be properly shaped and sharpened
The point of the nibs should be sharp enough to contain the liquid without it bleeding on the paper, but not too sharp to cut the paper.
- you need a liquid to put between the blades
The best thing about ruling pens is that you can use any type of liquid as long as it drips. This can be ink, watercolour, gouache, shell gold, gold size, masking fluid etc.
You fill the pen adding the liquid with a brush or dropper above the tip. Ruling pens are never dipped to fill as the nibs need to stay clean and dry on the outside so they can control the flow of the liquid.
- you need to learn how to use it to have the cleanest lines possible.
If you are using the ruling pen with a ruler, make sure it has the inking edge. This will prevent the liquid from bleeding onto the edge and ruin your work.
While using the pen, your lines should be sharp and clean with consistent (almost squared) starts and stops.
To learn more about how to use a ruling pen, I highly recommend this quick guide by Jeea Mirza.
TAKING CARE OF YOUR RULING PEN
Since I’m not an expert, I recommend you read this blog by Alan Adams about sharpening and cleaning your ruling pen.
Ruling pen: types and properties
November 20, 2023


+ show Comments
- Hide Comments